When you visit any website, it may store or retrieve information on your browser, mostly in the form of cookies. This information might be about you, your preferences or your device and is mostly used to make the site work as you expect it to. The information does not usually directly identify you, but it can give you a more personalized web experience.
Because we respect your right to privacy, you can choose not to allow some types of cookies. However, blocking some types of cookies may impact your experience of the site and the services we are able to offer.
You Allow:
Strictly Necessary Cookies(Required)
These cookies are necessary for you to browse our website and use its fundamental services,and they don't require your consent.These cookies allow us to offer you the essential functions of the website(account access,language used,order played,payment etc),and can also be used for identity verification and security.If you disable them,we will not able to fulfill your basic request.
These cookies collect anonymous information on your online operation behaviors that help us improve website construction. If you reject these cookies, you may not be able to use certain features of our websites and services.
These cookies allow us to remember the choices you have made about your preferences, such as what language you prefer. If you reject these cookies, you may feel that the efficiency of browsing the web has decreased.
These cookies carry out personalized activities to advertise products and services which you are interested. If you reject these cookies, you will still see advertisements that are not much relevant to your interest or demand.
 indi333
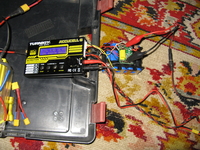
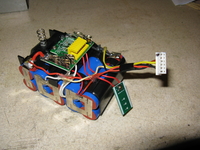
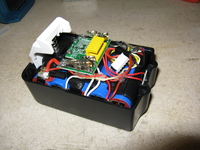
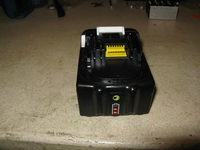
indi333 Mivel látom, hogy más, saját töltőd van, ezért azt javaslom, hogy iktasd ki a benne lévő elektronikát és forraszd ki a sárga kiegyensúlyozó csatlakozót. annak a helyére ugyan ilyen pozícióba szerkeszd bele amit már (kiegyensúlyozó csatlakozót ) beforrasztottál. A panelen csak a pozitív és negatív csatlakozót hagyd meg, a többit már bekötötted! Így nem kell szétszedni töltéskor, mert a sárga kiegyensúlyozó helyett a képen látható általad bekötött fehér csatlakozó lesz, amit fel tudsz dugni a képen látható TURNIGY töltődre. Ehhez egy anya-apa ( egyik végén mint amit ráforrasztottál ), hüvelyes - másik végére tüskés csatlakozós kiegyensúlyozó kábelt készíts ! Jó átalakítást. indi3333. Since I see that you have a different charger of your own, I suggest that you turn off the electronics in it and solder the yellow balancing plug. in the same place, edit in the same position that you have already soldered (balancing connector). Leave only the positive and negative connectors on the panel, you have already connected the rest! This way, you don't have to disassemble it when charging, because instead of the yellow balancer, there will be a white connector connected by you in the picture, which you can plug into your TURNIGY charger in the picture. To do this, make a nut-father (at one end like the one you soldered on it), a sleeve - at the other end, make a balancing cable with a spiked connector! Good makeover. indi3333.