03/02/2019
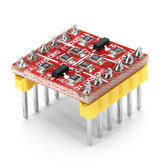
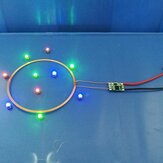
Nice board with quality component location and soldering.
The LED's don't make white if you turn on all three; just a bright colourful light; maybe a diffuser on the front might help if you wanted that.
The Arduino Nano and Uno only have 6 PWM outputs so you can't make that Battlestar Galactica Cylon faceplate look with the LED's fading as they move across (you could make this effect using a Mega or Duo). Here's some quick code to check the unit works.
//Arduino Nano Sketch for controlling the ARTOU RGB 8 LED Board
//Banggood item ID: 1396249
//https://www.banggood.com/5050-RGB-Full-Color-LED-Board-Light-Module-DIY-Robot-Accessories-For-Arduino-p-1396249.html
//Connect VCC to 5v
// array of 8 pins, where 2 refers to D2 pin and not physical pin 5
int myPins[] = {2, 3, 4, 5, 6, 7, 8, 12};
int REDled = 9; //these address the PWM pins which control the colour
int GREENled = 11; //these address the PWM pins which control the colour
int BLUEled = 10; //these address the PWM pins which control the colour
int Rlevel = 100; // 255 of fully OFF, 0 is fully ON
int Glevel = 255; // 255 of fully OFF, 0 is fully ON
int Blevel = 100; // 255 of fully OFF, 0 is fully ON
int rate = 100; // sets the speed the LED's flash
void setup() {
// setup the 8 LED pins
for (int i = 0; i <= 7; i = i + 1) {
//initialise pins as an output
pinMode(myPins[i], OUTPUT);
//set the LEDs to OFF
digitalWrite(myPins[i], HIGH);
}
// setup the PWM pins
pinMode(REDled, OUTPUT);
pinMode(GREENled, OUTPUT);
pinMode(BLUEled, OUTPUT);
analogWrite(REDled, Rlevel);
analogWrite(GREENled, Glevel);
analogWrite(BLUEled, Blevel);
}
void loop() {
//flash the LED's Left to Right
for (int i = 1; i <= 7; i = i + 1) {
digitalWrite(myPins[i], LOW);
delay(rate);
digitalWrite(myPins[i], HIGH);
}
//flash the LED's Right to Left
for (int i = 6; i >= 0; i = i - 1) {
digitalWrite(myPins[i], LOW);
delay(rate);
digitalWrite(myPins[i], HIGH);
}
}